Installing an air purifier in your home doesn’t require a licensed HVAC technician or special permits in most cases, making it a genuinely doable DIY project. Whether you’re dealing with allergies, pet dander, or just want fresher indoor air, getting the right unit in the right spot with proper installation will make a real difference in air quality. This guide walks you through choosing the location, prepping your space, and setting up either a ceiling-mounted, wall-mounted, or portable unit so it runs efficiently from day one.
Table of Contents
ToggleKey Takeaways
- Air purifier installation is a manageable DIY project that doesn’t require a licensed technician or special permits in most cases, making it accessible for homeowners seeking improved indoor air quality.
- Location is critical: portable units should be placed in central room areas at least 12 inches from walls and furniture, while ceiling and wall-mounted systems require interior walls and studs or heavy-duty anchors rated for the unit’s weight.
- Pre-installation safety checks must include verifying electrical capacity (300–1000 watts), using a stud finder for proper mounting, turning off circuit breakers, and inspecting walls for moisture or damage before you begin.
- Filter maintenance is essential after installation—HEPA filters need replacing every 6–12 months under normal use or every 3–6 months with pets and smoke, and neglecting filter changes is the leading cause of underperformance.
- Portable air purifiers are the easiest option requiring only unboxing and placement, while ceiling and wall mounts demand more expertise but can be completed as a DIY project if you’re comfortable with drilling and basic electrical work.
Choosing The Right Location For Your Air Purifier
Location is everything when installing an air purifier. A unit tucked in a corner or blocked by furniture won’t move air effectively, no matter how powerful it is. The best placement depends on the size of your room and the type of purifier you’re using.
For a portable standalone unit, place it in the central area of the room where air can circulate freely around it. Keep it at least 12 inches away from walls, curtains, and large furniture. If you’re purifying a bedroom, put it near the head of the bed or in a corner that lets air flow into the sleeping area. In a living room or kitchen, the center or near an entryway works well.
Ceiling-mounted and wall-mounted systems have different rules. Ceiling units should go in the center of the room if possible, drawing air upward and creating good circulation. Wall-mounted models perform best when installed on an interior wall (not an exterior wall where temperature swings affect efficiency) at about 6 feet high. Avoid placing any air purifier directly under air vents or return ducts from your HVAC system, they compete rather than cooperate.
Room size matters too. A smaller unit in a large open space won’t keep up. Check the purifier’s Clean Air Delivery Rate (CADR) rating and the room square footage it’s designed for. Installing it in an oversized room means you’re running it constantly on high speed, wasting energy.
Pre-Installation Preparation And Safety Checks
Before you install anything, do your assignments. Check your home’s electrical setup, make sure you understand the weight and mounting requirements, and inspect your walls or ceiling.
For wall and ceiling mounts: Turn off power to the relevant circuit at your breaker panel before you begin. Use an electrical outlet tester to confirm the circuit is dead. If you’re mounting to a wall, use a stud finder to locate wall studs, they’re spaced 16 inches on center in most homes. You’ll need to anchor into studs or use heavy-duty toggle bolts rated for the unit’s weight. A typical ceiling-mounted air purifier weighs 20–50 pounds: don’t guess on anchors.
For portable units: Check that your outlet is in good condition and not overloaded. Avoid daisy-chaining multiple power strips into one outlet. Your purifier will draw 300–1000 watts depending on the model: verify your circuit can handle it.
Inspect the wall or ceiling surface where you’ll mount. Check for moisture, mold, or soft spots, these indicate water damage and a poor mounting surface. If you’re in a rental, read your lease: many landlords prohibit drilling into walls or ceilings.
Always wear safety glasses when working overhead. Have a helper on hand when mounting anything heavy to a ceiling. Read the manufacturer’s installation manual completely before you start, different models have different requirements.
Step-By-Step Installation Instructions
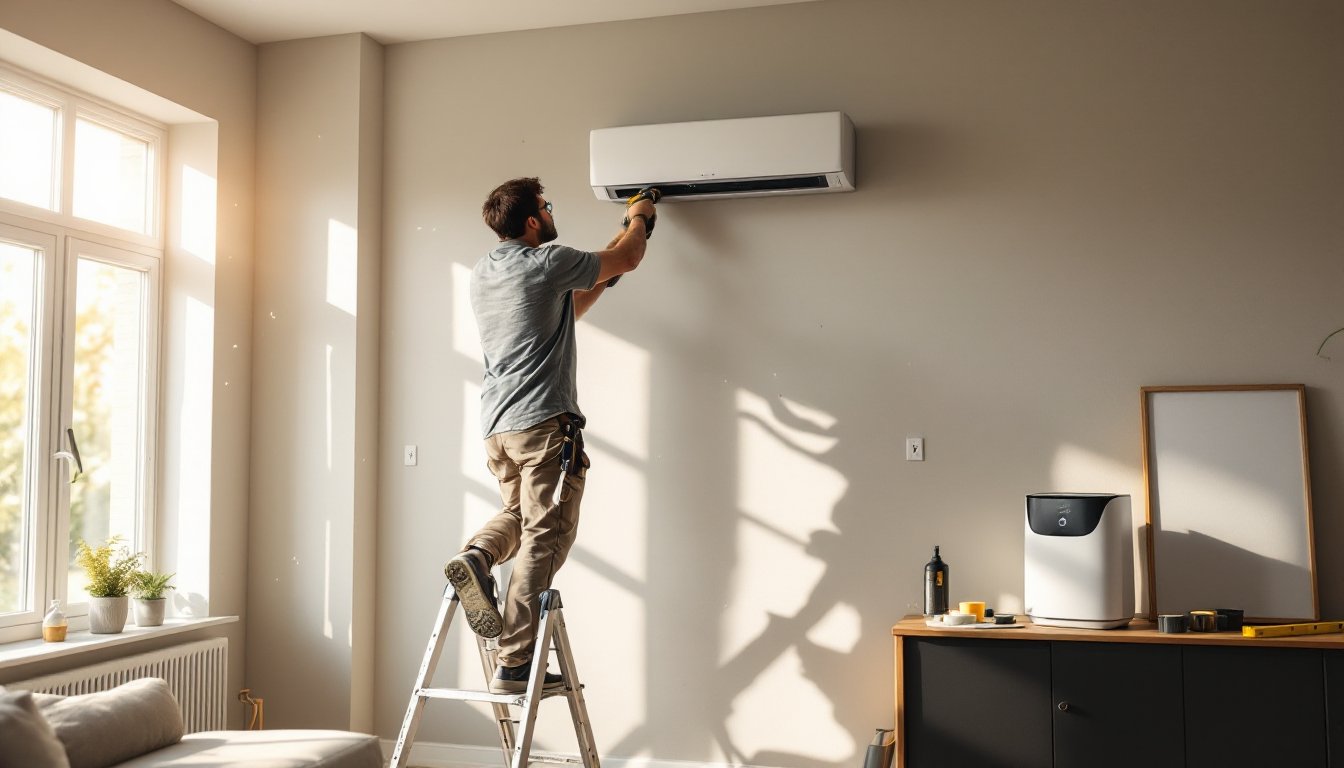
Ceiling-Mounted And Wall-Mounted Systems
Ceiling and wall installation involves drilling, anchoring, electrical work, and sometimes ductwork. These are doable for a confident DIYer, but if you’re unsure about any step, bring in a professional.
Materials you’ll need:
- Drill with bits (carbide or spade bits for drywall and ceiling)
- Stud finder
- Level
- Drywall anchors or lag bolts (rated for the unit’s weight)
- Wire strippers and electrician’s tape
- Dust mask and safety glasses
Installation steps:
-
Mark the mounting location using the template provided in your purifier’s manual. Use a level to ensure the bracket is square. If mounting to a ceiling, have a helper hold a flashlight so you can see what you’re doing.
-
Drill pilot holes at the marked locations. For ceiling mounts, drill straight up into the center of joists if possible. Joists run perpendicular to the direction of the room and are typically 16 inches apart. If you can’t hit a joist, use heavy-duty toggle bolts designed for drywall.
-
Install the mounting bracket using the appropriate fasteners. Tighten bolts in a star pattern (opposite sides alternately) so the bracket sits flush and level.
-
If your unit requires ductwork or electrical connections, this is where it gets technical. Most modern air purifiers use flexible ducts and quick-connect fittings. Slide the duct over the outlet and secure it with a hose clamp or zip tie. Make sure the duct isn’t kinked or pinched.
-
Wire the unit according to the manufacturer’s diagram. Turn off power at the breaker, strip about ½ inch of insulation from each wire, and connect like colors (black to black, white to white, green or bare to ground). Use wire nuts to secure connections and wrap them with electrician’s tape. If you’re uncomfortable with electrical work, hire a licensed electrician.
-
Turn the power back on at the breaker and test the unit. Listen for unusual noise and feel for airflow at vents and returns.
Professional installation typically costs $300–$800 depending on complexity, according to recent pricing data on air purifier installation.
Portable And Standalone Units
Portable units are the easiest to install and require almost no prep work. They’re also the most flexible, you can move them to different rooms as needed.
Materials you’ll need:
- Power strip or extension cord (if needed)
- Cleaning cloth
- Mild detergent
Installation steps:
-
Unbox the unit and inspect it for damage. Remove all plastic packaging, protective covers, and tape. Check that all parts are included by comparing them to the manual’s contents list.
-
Place the unit in your chosen location, making sure it’s stable and level. Don’t set it on carpet if the base has air intake vents: it’ll restrict airflow and overheat the motor.
-
Check that the inlet filters are installed correctly. Most units come with a pre-filter layer (catches dust and hair) and a HEPA filter. Slide them into their slots until they click or lock. Double-check the arrow directions, filters have an intake and exhaust side, and installing them backwards kills efficiency.
-
Plug the unit into a nearby outlet. If no outlet is convenient, use a heavy-duty extension cord or power strip rated for the purifier’s wattage. Avoid lightweight extension cords, they overheat.
-
Turn it on and set it to the lowest speed for the first 30 minutes. Listen for unusual sounds. A quiet hum is normal: grinding or squealing suggests a problem. If something sounds wrong, unplug it and contact the manufacturer.
-
Let it run at medium or high speed for at least 2 hours on your first day. This helps the motor break in and lets you see if the air circulation pattern works for your room.
Tom’s Guide’s setup guide offers a helpful walkthrough of initial setup for most popular models.
Maintaining Your Air Purifier After Installation
A newly installed air purifier needs regular maintenance to work properly and last for years. Neglecting filters is the number-one reason DIY-installed units underperform.
Filter replacement schedules depend on your model and air quality. Most HEPA filters last 6–12 months with daily use. If you have pets, smoke, or severe allergies, change them every 3–6 months. Pre-filters (if separate) might need monthly checks and rinsing with water and mild soap. Always check the manufacturer’s recommendation, it varies.
Clean the unit’s exterior monthly with a damp cloth and mild detergent. Wipe down the intake and outlet grilles to remove dust buildup. This prevents airflow restriction and keeps the motor from working harder than necessary.
Check electrical connections on wall and ceiling mounts every 6 months. Look for loose bolts, frayed wires, or corrosion. Tighten any loose fasteners. If you spot wire damage, turn off power at the breaker and contact a licensed electrician.
Monitor performance. If you notice reduced airflow, increased noise, or a musty smell, the filters are likely dirty. Replace them rather than trying to clean and reuse them. A plugged filter makes the motor work overtime, shortening its lifespan.
Home automation and smart devices are increasingly used for filter monitoring, some newer units send alerts when filters need replacing. If you’re upgrading, look for smart models that fit your home setup.
Conclusion
Installing an air purifier is a manageable DIY project that improves your indoor air quality without very costly. Portable units need just unboxing and placement. Wall and ceiling mounts require more skill but are doable if you’re comfortable with drilling, fastening, and basic wiring. The key is choosing the right location, prepping properly, and following the manufacturer’s instructions exactly. Once it’s running, consistent filter maintenance keeps it working efficiently for years.