Upper kitchen cabinets are the unsung heroes of kitchen function and aesthetics. They sit at eye level, claim valuable vertical space, and set the visual tone for the entire room, whether you’re going for sleek modern minimalism or warm traditional charm. The right upper cabinets keep daily-use dishes and glasses within arm’s reach, reduce clutter on countertops, and can make a compact kitchen feel larger and more organized. Whether you’re renovating a dated kitchen or tackling a DIY refresh, understanding your design options and installation requirements will help you maximize both storage and style.
Table of Contents
ToggleKey Takeaways
- Upper kitchen cabinets serve as both functional storage and a major design statement, capable of adding 30–50% more usable storage in smaller kitchens without consuming floor space.
- Modern upper cabinet styles emphasize clean lines and minimal ornamentation, while open shelving and glass-front options let you display dishware while maintaining style and accessibility.
- Maximize storage efficiency by analyzing what you actually store, using adjustable shelves, pull-out organizers, and corner inserts to transform wasted space into practical storage.
- Proper installation of upper cabinets requires locating studs, using quality lag bolts spaced 16 inches apart, and working with a helper to ensure level, secure mounting that resists sagging over time.
- While DIY installation is possible for confident builders, hiring a professional is worthwhile if your walls are out of plumb, custom joinery is needed, or you want precision finish work.
Why Upper Kitchen Cabinets Matter
Upper cabinets serve dual purposes: they’re functional storage and a major design statement. Unlike lower base cabinets, which bear weight and require footprints on the floor, uppers float on the wall and instantly draw the eye. They frame windows, break up wall space, and let you display glassware, cookbooks, or decor items if you choose open shelves or glass-front doors.
The strategic placement of upper cabinets also affects kitchen workflow. Storing everyday dishes, cups, and glasses at shoulder height beats rummaging through deep drawers. They keep little hands out of lower cabinets, hide cooking clutter, and visually connect a kitchen’s upper and lower halves. In smaller kitchens, properly configured uppers can add 30–50% more usable storage without eating floor space, a critical win in tight layouts.
Popular Styles and Design Trends for Upper Cabinets
Modern and Minimalist Designs
Contemporary kitchens favor clean lines, flat-panel doors, and minimal ornamentation. Think sleek slab or handle-less designs where integrated finger pulls or push-to-open hardware stay nearly invisible. Colors lean neutral, matte white, soft gray, or natural wood tones, with minimal crown molding or fussy trim. This approach pairs beautifully with waterfall countertops, bar seating, and minimalist backsplashes, giving the space a gallery-like calm.
Modern upper cabinets often sit higher or in asymmetrical groupings, leaving some wall space visible to avoid a “wall of cabinets” feeling. Lighting, whether LED strips under the cabinets or recessed spots above, matters here because it emphasizes the clean geometry. The trade-off? Handle-less designs require a gentle push to operate, and they show fingerprints more readily on high-gloss finishes.
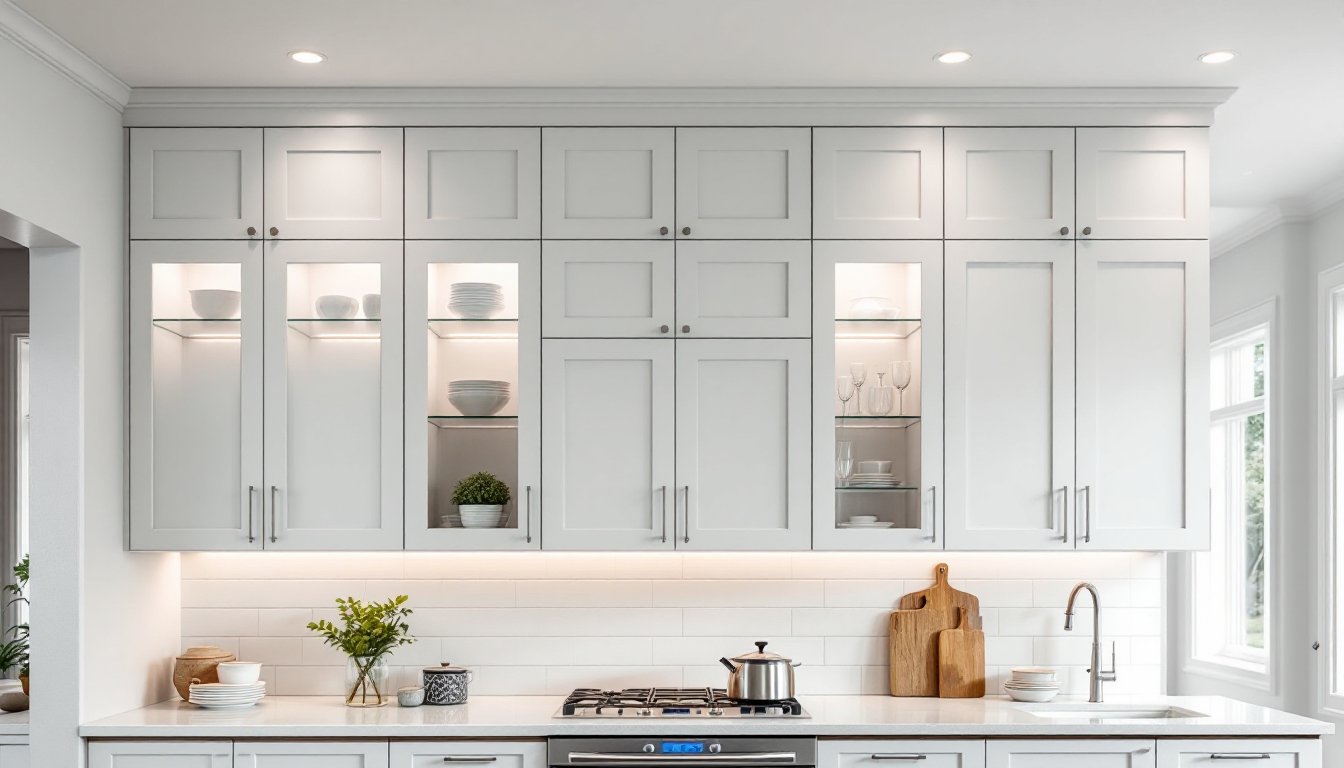
Open Shelving and Glass-Front Options
Open shelving has moved beyond the Instagram trend phase. Homeowners appreciate displaying favorite dishware, glassware, or cookbooks, and the accessibility. But, open shelves demand constant styling: dishware must be attractive enough to live on display, and dust settles quickly without cabinet doors to shield contents.
Glass-front cabinets split the difference. They let you show off nice serving pieces while keeping dust and grease splatter at bay. Styles range from traditional mullioned frames (multiple small panes per door) to contemporary single-pane designs. 10 stylish and practical upper kitchen cabinet options showcase both approaches, from handcrafted wood frames to frameless glass. If you go glass-front, plan for interior organization, open shelves mean shelf styling and grouping matter visually.
How to Maximize Storage and Functionality
Smart upper cabinet design doesn’t just look good: it works harder. Start by analyzing what you actually store: dishes, glasses, small appliances, pantry overflow, or serving pieces. Size your cabinet boxes and shelf heights accordingly. Standard upper cabinet depth is 12 inches (actual interior depth is roughly 10.5 inches after wall thickness and backing). Height varies, common sizes are 12, 15, 18, and 24 inches. Stacking a 24-inch cabinet above a 12-inch upper creates visual interest and maximizes reach without excessive bending.
Interior organization systems, pull-out shelves, spice racks, and vertical dividers, transform wasted space into usable storage. Adjustable shelves let you reconfigure as needs change. Corner cabinets are notorious space-wasters: lazy Susan inserts or pull-out organizers recover that awkward corner real estate. If you’re installing cabinets yourself, plan electrical runs for under-cabinet lighting before final installation, fishing wires after the fact is frustrating.
Don’t overlook the wall condition before hanging cabinets. Locate studs with a stud finder and mark them clearly: cabinets must anchor into solid framing, not drywall alone. Use quality lag bolts (5/16-inch or larger) spaced 16 inches apart, driven into studs at least 1.5 inches deep. Skimping on hardware is a recipe for a cabinet sagging down mid-cooking.
Installation and DIY Considerations
Upper cabinet installation is doable for a confident DIYer, but it demands precision and usually a helper. Unlike lower cabinets, you’re fighting gravity and mounting on walls that may be uneven. Here’s what to know:
Prep and Planning: Start by finding studs and marking a level line where the cabinet tops will sit. Use a 4-foot level and a pencil: laser levels speed this up significantly. Measure twice, account for any tilted walls or uneven floors, and mark mounting stud locations. Many DIYers miss this step and end up with cabinets that twist or sag over time.
Installation Steps:
- Assemble cabinet boxes in place or pre-assembled, depending on design. Shaker-style cabinet builds, like those in free woodworking plans for Shaker cabinets, require more precision if you’re building from scratch.
- Get a second person to help hold cabinets level while you drive fasteners. Seriously, one person on a ladder while screwing and checking level is a recipe for frustration or injury.
- Drill pilot holes to prevent splits in wood or damage to cabinet veneer.
- Use lag bolts into studs, not drywall anchors alone. For additional stability, use a cabinet jack (a simple T-shaped bar that props cabinets while fastening).
- Install doors and drawers after cabinets are secure. Adjust hinges for proper alignment, typically a 1/8-inch gap between doors.
Professional vs. DIY: If your walls are badly out of plumb, electrical conduit runs behind where cabinets sit, or you want precision joinery and finish work, hire a cabinet installer or carpenter. A few hours of professional labor beats weeks of frustration. Building custom cabinets from raw lumber demands woodworking skills beyond basic assembly, table saws, dado joints, and finish carpentry add complexity. Simple pre-fabricated cabinet kits are more forgiving. Always wear safety glasses and work gloves during installation.
Permits and Inspections: Most kitchen cabinet installation doesn’t require a permit unless it involves electrical or structural changes. Check local codes: some jurisdictions inspect kitchens as part of larger renovation permits. If you’re replacing cabinets and adding outlets or moving plumbing, a permit protects you if something goes wrong.
Conclusion
Upper kitchen cabinets deserve thoughtful planning, not an afterthought. Whether you choose sleek modern styles, open shelving, or classic glass-front designs, the key is matching form to function, beautiful cabinets that actually hold what you need and fit your space. Take time with measurements, don’t skimp on mounting hardware, and don’t hesitate to call in help if walls are crooked or the job demands precision joinery. A well-installed upper cabinet setup rewards you every day you cook.